Bed Platform
Yeah yeah, I’m still on about the bed platform. I may have said it before; the place where you spend a third of every day and your experience there affects the other two-thirds of your day, it’s important to get it right.
I believe I’ve finally puzzled out a good workable design. I was trying really hard to resist planning to use linear actuators; it’s just another electrical device that can fail. But to achieve the result I want, without adding a crazy amount of other complexity (which has its own increased chance of failure), I have succumbed. And going this route simplifies, or eliminates, so many of the other design issues.
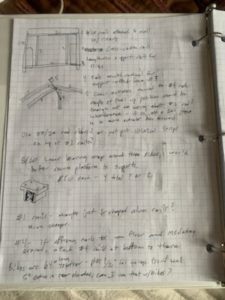
 I keep a thin binder full of graph paper that I scribble in as thoughts pop into my head, and a couple of days ago I filled two pages just on the bed platform.
This design will use a combination of 80/20 extruded aluminum, mainly for the support structure, and 2×2 wood and Ikea bed slats for the main bed platform. Current plan is to bolt L-shaped aluminum rails to the van wall to hold up the horizontal 80/20 rails. (I may just bolt on small pieces of these rails; there may be no need to use full length pieces.) More 80/20 will be used for lengthwise supports, doubling as the bases for the sliding solution. And then vertical 80/20 rails at the rear end of the platform, both for basic load support, and also for mounting the bases of the linear actuators. The actuators will need to be mounted offset from the main structure so there is no overlap/interference. Another pair of vertical supports will go at the front end of the support structure, both for increased load support and also to serve as mounts for the wall separating the garage from the main cabin.
The main trick will be the mounting positions of both ends of the actuators, finding the sweet spot where the action can get going when the platform is fully deployed and flat.
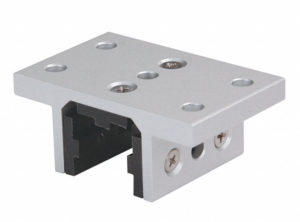
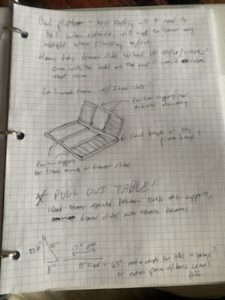
To allow the fixed flat portion of the platform to slide, I’m going to use these 80/20 components. These will be screwed into the bottom of the wood platform, and slid onto the lengthwise 80/20 rails prior to assembly. The material on the inside is the UHMW plastic I’ve
posted about before; this component will slide fairly freely along the rail its attached to. It will also serve the purpose of securing the main bed platform to the support structure.
These suckers are $50 each, so I have an internal debate on whether to use one on each side or a pair. But, just thinking about it, I wonder if I couldn’t fabricate my own components that works the same…? I could simply buy the UHMW pieces for a few bucks each. A chunk of a 2×4 piece of wood, trimmed out appropriately, might well do the trick.
Control Panel
Another plan of mine from some days ago was to add a ceiling-to-floor installation on the driver’s side of the cabin, in front of the small bench seat just forward of the garage, and just behind the main kitchen cabinets/countertop. This would give me a bit more vertical surface to use in the kitchen area.
The idea I had later was to make this installation thicker than initially planned, maybe around 5″ wide, build it so it’s hollow, and route much of the electrical system wiring to this space. I could mount some of the fuse panels, breakers and cutoffs in this hollow space; and a hinged door on the rearward side could house many of the system monitors and switches. I’m unsure as to whether this is a workable plan as yet; there may be issues with having some of the cutoffs and fuses too far away from the main source of the power (the battery bank). It also may necessitate thicker gauge wire for some of the runs in between. These are issues I’ll be researching.
Projector Screen
Last night while attempting to fall asleep, I had (what I thought was) a brilliant idea, thought to myself “I should write this down…naaaah“, fell asleep, and then forgot about it, until a few minutes before starting this post. “Wait… I know I had a neat idea last night… what was it… oh yeah!”
With the aforementioned ceiling-to-floor installation, I’m going to look into making it double as a projector screen mount and hideaway. The idea is to take the 5″ wide surface and make a fair bit of that width a mount for a projector screen; with a hinge at the top, I would be able to unlatch it at the bottom, raise it up so it reaches across the cabin, and then deploy the screen. I would need to puzzle out a way to get this mount to stay deployed on its own, and then easily dropped again.
My initial thoughts on a screen was to attach one to some sort of long cylindrical post, and to build in resting slots on a cabinet face on either side of the cabin; just pull the whole thing out, drop it into the mounts, and pull the screen down. The problem with that plan I didn’t like was the necessity to store the screen away somewhere when not in use – clunky, inelegant.