Today is a reasonably nice day out, so I decided to get back to work on my bed platform prototype.
A couple of of days ago I ran to a nearby hardware store and procured the hardware I figured I would need to finish this off. Naturally I miscalculated and had to run back two times since for more stuff. That is, I expect, the way of van building. “Off to Home Depot, again“.
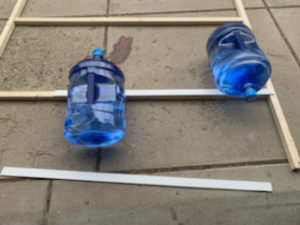 First task to start is getting my plastic strips glued down to the base platform. I didn’t want to try using screws or nails, due to the risk of something poking out the tops of the rails and interfering with the sliding action, so I went with Gorilla Glue. And seeing as I have no clamps… I improvised. (Handy having a housemate who is a water delivery guy, we always have full jugs in the house!)
Next up is getting my shiny new futon frame hinge mounts attached to my two bed platform frames. I was unusually smart on this; before doing anything that I couldn’t recover from, I grabbed a pair of scrap 2×2 pieces and set them into the channels on one hinge frame, to make sure I wasn’t going to have any interference between the two when folding the hinge either way. Everything looked good, so I marked spots on each scrap with a Sharpie, through the mount holes, and used those marked scraps to mark my platform pieces in the right spots to pre-drill holes.
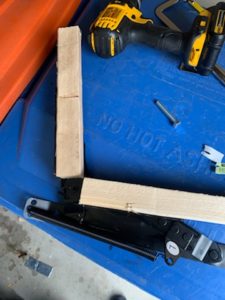
That, however, was the first of my not-smart moves. One of the marks I transfered over was slightly off, which entailed having to use the drill to enlarge the hole a bit in order to get the bolt through.
The second of my not-smart moves was pre-drilling holes on the wrong side of the platform 2x2s. Fortunately, the holes were drilled through the pieces that were fastened on either end with screws, so it was a simple task to loosen these pieces up, rotate them, and tighten them back down. Whew. (With the second frame, I positioned the frame in the hinge and marked the hole targets directly, and had no issues.)
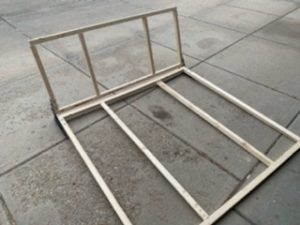
After another run to the hardware store – I had gotten half the washers I needed to start with, derp – I could bolt everything together, and it looks like it came out pretty well. It’s basically impossible to open and close this sucker without it being properly mounted. Once the glue on the plastic rails is cured, the next task will be figuring out how to add supports in the right positions so I can mount the futon hinges.
 That may be tricky; thinking back to my old futon frame, and looking at these hinges now they’re in place, I realize the mounts need to be on the outsides, so my base platform will need to be a bit wider than the main bed platform. Fortunately, it is a bit wider now, but is it wide enough? I may need to remove the long cross-pieces and substitute in some longer boards, which is a shame, that’s a waste unless I find another use for those 2x2s.
Someone commented (my second comment, woooo!) on an earlier design post regarding my plan for bike storage, suggesting something I’d considered, which was to pull the seatposts out of the frames entirely to gain several inches of height, inches I could use to drop the bed platform lower.
Going by some old notes, with the seatposts still up, the height necessary for storing the bikes is 34″, and with the bed platform structure and bedding heights added in, I feel I still have plenty of vertical room up top. It’s certainly going to be tall enough to accomodate the rearward third of the platform angling upwards. But, he’s right; extra room is extra room. I’m not too worried about losing that space in the garage area, and I’ll be in the bed area pretty much every day, so that’s a legit strategy.
On that note, the other day I ran across one YouTube video, one that I didn’t get around to watching or bookmarking, so I had to go hunt it down. That’s two minutes I’ll never get back! It piqued my interest as the fellow went about bike storage in a different way – he built a sliding rail from the top of the ceiling that his bikes would hang from. Hanging them like this meant it’s far less of a worry to remove the rear wheel; the chain isn’t going to get grease all over the floor, the rear derailleur won’t be resting on anything to get damaged. Without needing to drop or pull the seatpost (requiring adjusting every time the bike is pulled out), this would reclaim about as much space as the seatpost-pull strategy.
This fellow ended up giving up on his design; he goes through several issues he ran across, but it was a prototype. Just watching that video got me thinking up several alternate ways to accomplish the goal. I’ll definitely be giving this more thought in days to come.
The trick for me is something this fellow had also mentioned, which was how to manage this setup with two bikes. My plan for mounting bikes on the floor currently entails staggering them lengthwise slightly, enough so handlebars don’t interfere with each other, and mounting them both pointing toward the rear. Trick there would be, to get the rear one out, I’d have to pull the front one too. I kinda see the same issue here; but maybe the hanging tray setup could be designed so the whole tray pulls out, and then one bike or the other can be removed without disturbing the other…
Another issue that seems apparent from the thumbnail on the video is the hanging chain. It appears it would droop enough to drag on the garage floor there. I’m thinking maybe some sort of strap with a hook of some sort; hook the chain, raise the strap, attach it to the sliding mount. The problem I potentially see is the chain sliding off one end or the other due to road vibration and still dragging. Maybe just a pair of velcro straps wrapped under the chain in two spots and over the chainguards would be a solution.
Yet one more concern would be wobble. Do I set this up so that the whole frame is as fixed in position as possible? Or something a bit looser, much like those hook-and-pulley bike storage systems folks use in their garages; lower the ropes, hook the handlebars and seat, and pull the ropes to haul the bike up to the ceiling and tie it off? No risk of sway and bike frames damaging one another with flying pedals, there. Fixed would be best, and probably, some sort of padding in between; blocks of some slightly squishy material with frame-sized cutouts in the right spots on each end, to keep the bikes from bouncing toward one another.
I looked at a van today! A 2005 158″ wheelbase Sprinter 2500. Started nice, ran nice, had plenty of power.
Alas, there’s a fair bit of rust that I could see without even digging too hard, but that’s addressable; the worst part is the price. The guy wants waaay too much for it, and I know this because I got to look at the last registration card for it, which had the last purchase date and price – about 40% of what he’s asking.
I may go back and take it to a top-notch Sprinter shop in town at some point, get it inspected. If the cost of rehabilitating it is low enough – assuming it’s even worth fixing up – then I’ll give consideration to making this guy an offer, far far below his asking price. Below the last purchase price (from four years ago).